Tuesday, June 30, 2009

DWT Format and Drawing Versions

It may come as an awful surprise, to find that the DWT format is independent of the DWG format mid-upgrade. This means if you save your template files as a 2010 DWT, older versions won't get it. You may have your options set to save as 2004, but that will not affect DWTs they will remain 2010.

If you find yourself in this situation, the best way I know to set things back (if you have mixed versions being used) is to open the template in 2010 and export it to AutoCAD. Pick the oldest version you need, but I go back to 2004 because it predates most AEC problems you might encounter otherwise. If you don't, you might get the error below when opened or used in older versions.
The Export to AutoCAD command creates a DWG file. You can now rename this file to a DWT in Windows Explorer or use the Save as function to create the new (old) DWT file you need.

I'm not sure any of that made sense.

Monday, June 29, 2009

Layer Search

Do you ever find yourself in the situation where you are searching for a layer to control?

Sha-yeah.

It can be like finding a needle in a stack of needle shaped hay. Give this a shot next time. Tucked away in the upper right-hand corner of the Layer Properties palette is the layer search tool.
You can use a combination of characters and wild-cards (the asterisk represents any group of characters and the question mark represents any single character) to find just about any layer quick and easy. Say you are looking for a specific wall layer. type *wall* in the search box and hit your enter key, now the only layers listed have the word wall in them. Nice.

Wednesday, June 24, 2009

Publishing Changes in AutoCAD 2010

In older versions of AutoCAD when adding sheets to be published you could specify to only import the layout tabs and leave model space out of it directly in the publish dialog (see image below).
To do the same in AutoCAD 2010 you must first select the sheets button (see image below).

Then see the "Include" drop down menu to only add layouts (yet another image below).


Thursday, June 18, 2009

Object Snap - Quick Tip

In AutoCAD 2010 you can quickly add or remove a running object snap by right clicking on the object snap icon at the bottom of your drawing area and picking the snap to add or remove.

Monday, June 15, 2009

Hidden Gem - Multiple

Here's one that maybe you don't use everyday, but you should. Some commands work better in rapid succession. I place receptacles in building 30 at a time. In the old days I would select the duplex tool from my palette, place a receptacle, select the tool again and place another one, and so on and so on. These days I invoke a little known beauty call Multiple.

Multiple is a command that will repeat any other command until the user escapes out of it. You type in Multiple on the command line and AutoCAD asks which command you would like to repeat. I have a lisp to insert a receptacle at the proper rotation, scale and layer. I combine this with the multiple command in a macro to machine gun in as many receptacles as I want.

Just in case you were wondering, if you invoke multiple and ask it to multiple multiple times, the universal does not explode. AutoCAD will not allow you to invoke a multiple in a multiple.

Yeah... I tried it.

Friday, June 12, 2009

AutoCAD 2010 That Old Time Interface

You may know or even be an experienced AutoCAD user who thinks... "Back in the old days we didn't use the new fangled icons on everything. What's wrong with just writing snap or grid?". Kids today don't even know how to read.

If you are feeling nostalgic for the old drafting setting across the bottom of your screen, right click on a new fangled icon and de-select "Use Icons".

Check it out. Now you can show your age proudly and confuse youngsters at the same time. Take that whipper-snappers.

Wednesday, June 10, 2009

A Quickie on Quick Properties

If you are using AutoCAD or AutoCAD MEP 2010, there is no doubt that you have noticed the Quick Properties palette floating around. If you like it or don't like it, it's good to know you have options.

Maybe the easiest ways to access your options is to click just below the X at the upper right-hand corner of the Quick properties palette to expose a pop up menu of options for;
Close Closes the current Quick Properties palette
Disable Turns the Quick Properties palette option off
Settings Opens the Setting dialog (See Image 2 below)
Location Mode
Cursor Palette appears at the current cursor location
Static Palette appears only at the last specified location
Auto Collapse Allows palette to expand and contract in size
Customise... Opens the CUI (see image 3 below)

Image 1

Image 2

Image 3


Tuesday, June 09, 2009

-attedit


There is an old command that really rocks for block with attributes. I use it every day in a lisp and rarely think about it. I use an attributed block for a receptacle. The attribute looks great as long as the wall is horizontal. If the wall is verticle, well so will the attribute.


Unless of course I used this little gem, -attedit. See the command line of what it does below.


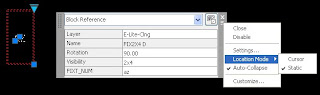
It allows users to select the attribute inside a block and change it's postion, height, angle, style, layer or color and all from the command line. This is nice because you can write it into a lisp to automatically change the angle of blocks instered at 90 degrees back to zero.


Here is a code sample for you.

(defun c:AA0 ()
(command "-attedit" "" "" "" "" PAUSE "" "A" "0" "")  
   (princ)
)

It shouldn't be a big jump to change any of the other options in the attedit command by lisp like color and style now. Go ahead and give it a try, you have tons of free time and think this is fun anyway, right?